
Showing posts with label Project Inspiration. Show all posts
Showing posts with label Project Inspiration. Show all posts
Wine Crate Wall Shelf DIY
Along the same lines of my previously posted Crate Shelf DIY, Apartment Therapy recently posted a DIY article about a wall shelf made from a wine crate. What a great, simple idea!

Animal Archetypes : Space, Animals, and Psychology
I recently came across this illustration series called Archetypes by Attitude Creative. It was "a personal project reflecting our love of space, animals, and psychology."
These Archetype illustrations are available as iPhone wallpapers, but I've read that eventually they'll be sold as t-shirts and bags!


These Archetype illustrations are available as iPhone wallpapers, but I've read that eventually they'll be sold as t-shirts and bags!


Toys for All Ages : Balancing Blocks
If there are children in your life - even if they're your friends' kids - go ahead and get these blocks for them! Their organic shape, handmade quality, and topsy-turvy facets will surely entertain any kiddo. Matter of fact, I'd love a set of blocks in my own home to practice my zen rock balancing with these Balancing Blocks.

Inspiring Artist : Brian Dettmer
Brian Dettmer makes some great work! Using surgical tools, he dissects each book by carving one page at a time to expose images and images to form a visual that represents alternate histories and memories. It's book surgery in it's finest form of art. Great work!


He says this about his work : "My work is a collaboration with the existing material and its past creators. The completed pieces expose new relationships of the book's internal elements exactly where they have been since their original conception."
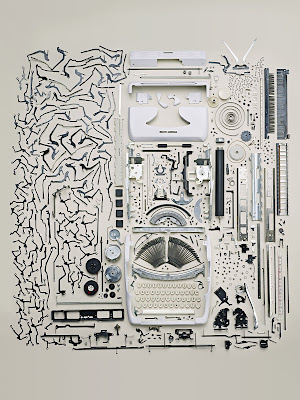
Disassemblies
I nearly gasped out loud when this post came through my Google Reader the other day. What a beautiful set of extruded mechanics by Todd McLellan.




Wilderness Appreciation : Lovin' the Fungi!
Wild mushrooms must be one of the most beautiful things that grow! Often nestled in a small nook near a rock or hidden within the mosaic of tree bark, you can't resist to ooohhhh and aahhhh if you spot one during a game of "I spy" while on a nature walk.
Design Sponge recently featured their "Mushroom Madness" adventure featuring a DIY mushroom garden centerpiece project. Wouldn't I just LOVE to have an abundance of these as decorations all over my home. I'm always drawn to showcasing nature in my home - I certainly wish I could play wilderness "I spy" more often. I suppose that is one of the drawbacks of living in the city.


Design Sponge recently featured their "Mushroom Madness" adventure featuring a DIY mushroom garden centerpiece project. Wouldn't I just LOVE to have an abundance of these as decorations all over my home. I'm always drawn to showcasing nature in my home - I certainly wish I could play wilderness "I spy" more often. I suppose that is one of the drawbacks of living in the city.


Vintage Arrow Valentines
My lovely and talented friend Halligan Smith created this amazing DIY project for Design Sponge just last week. These vintage arrow valentines are perfect for February Valentines home or office decorations or even to hand out to your loved ones. So cute!


Anchor Space Pale Ale : Bottling Day
Great news from Anchor Space homebrew.... we just bottled our first batch this weekend! After sanitizing all of our bottling equipment, bottles, and caps, we successfully filled almost 8 six-packs of our Anchor Space Pale Ale. Now we wait again for more fermentation. After a few weeks, we will test them out!
Don't worry, custom labels are on the way!
Don't worry, custom labels are on the way!
 |
| Sanitized bottles. |
 |
| Sanitized bottle caps. |
 |
| Anchor Space partner, Josh. |
 |
| Siphoning into the bottling bucket. |
 |
| First bottled brew! |
Anchor Space Pale Ale : Homebrew-Style
Last weekend, Josh and I experimented with our joint Christmas present to each other : a starter homebrew kit from Brooklyn Homebrew.
As intimidating as we thought homebrewing would be, the process was rather simple and straightforward. Quite enjoyable, actually. It felt like we were the guides of our own science experiment, and were very excited when our brew began to foam indicating that we successfully began fermenting!
Here's a little overview of how we brewed our first batch of Anchor Space Pale Ale :
With a ton of unknown equipment spread out across the office floor, we explored "The Complete Joy of Homebrewing" book to familiarize ourselves with what we had and what we were supposed to do with it. It's important to note that we followed an ingredient kit prepared by Brooklyn Homebrew to make our first round easy... we're really glad we did! After a half-hour introduction, we sanitized all of our equipment, and got a pot of water on the stove.
We seeped our grain mixture in some water to infuse the water with all of its flavors. We added some more water, brought it to a boil, added three different hop variations at different increments, and finally added the pre-made malt liquid to the boiling water. This combined mixture is called wort. Once the wort boiled for the proper amount of time, we used a copper tubing coil to chill the wort quickly. Once chilled, we transfered the wort to our fermenting carboy, filled the carboy with more water to equal 5 gallons, and added the yeast.
The next morning when we woke up, the yeast was doing it's job fermenting. Success! Our brew will remain in the fermentation carboy for 7 - 14 days at which point we will add sugar, bottle the brew, and let it ferment once more in the bottle before enjoying the fruits of our labor. All in all, we will have spent 8 hours brewing beer, 2 months allowing it to ferment properly, and will result in almost 9 six-packs of our own Anchor Space Pale Ale creation to enjoy. Pretty good deal if you ask me!
We're looking forward to making our next round of Anchor Space Brew in the near future.
 |
| Drinking brew while brewing |
Here are a few photos of our process :
 |
| Sanitized Equipment |
 |
| Hops and malt |
 |
| Rapid-cooling the wort |
 |
| Adding the malt |
 |
| Into the glass fermentation carboy |
 |
| First day of fermentation : success! |
Otis Redding..... Musical Love
Man, I sure do love me some Otis Redding. His music soothes my soul, makes me joyous, and undoubtedly compels me dance. While in Knoxville last week, I was sure to check out Yee Haw Industries for the latest and greatest print work. I found this gem, but didn't purchase it. Maybe next time!
Ahhhhhh, Otis.

On an inspiration note - maybe I should work on a little project featuring another favorite musician Ray LaMontagne???
Ahhhhhh, Otis.

On an inspiration note - maybe I should work on a little project featuring another favorite musician Ray LaMontagne???
DIY Crate Shelves
There's a strange space in our living room that is currently not filled properly. I'd LOVE to add this Crate Shelf and with a record player on top in that space. I think it would work perfectly!


Now the tough part will be finding the best crates!
DIY Holiday Wreaths
Our little Brooklyn apartment is small enough that fitting a full-size Christmas tree in it is a little bit unreasonable. Usually we settle for a couple of greenery wreaths. This year, in addition to the wreaths, I'd like to incorporate a couple "upcycled" wreaths. Here are some DIY wreaths I'll be attempting :
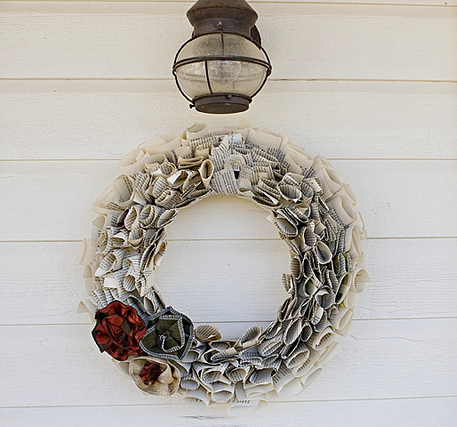 |
| Book Wreath |
 |
| Paper Leaves Wreath |
 |
| Paper Wreath |
 |
| Yarn Wreaths |
And if you really want to try something challenging, try this Garden Wreath :
 |
| Garden Wreath |
Maine is for Lovers
I think the "newlywed" phase is really the only justifiable time for self-indulgent home decorations. We decided to dedicate a couple of areas in our home to our milestone travels to Maine. Personally, I don't think it's too much. Hope you agree.


Center for Alternative Photography - Platinum & Palladium Workshop
Over the weekend before Thanksgiving, I was lucky enough to be a part of the Center for Alternative Photography's Platinum & Palladium two-day workshop. The workshop was led by Carl Weese and was an all-inclusive beginner crash course on this precise method of printing. I assisted Carl as an intern, helping with the photographic and printing processes quite a bit.
A brief description of the printing method :
Developed in the 1870's, platinum and palladium printing is a contact printing method where an individual sheet of fine art paper is coated with a platinum or palladium (sometimes both) emulsion, exposed to UV light, then developed to reveal a beautiful print (if all goes well). The ideal result is a beautiful print portraying fine variances in tone and color which is composed of tiny particles of non-reactive platinum and palladium embedded within the fine art paper. It is a very sensitive and time consuming process where the photographer / printmaker has enormous control of the print's color, tone, and surface with selections of paper and it's chemical formula along with the selected materials and procedures.
During our workshop, students photographed on 4x5 black and white film, developed the film with Carl, and experimented with many of the platinum / palladium variables including paper types, chemical balances, and exposure times. I'm very happy to have been involved, and hope I can work with the Center for Alternative Photography again!


COM-POST
Some friends of mine are starting a new zine project called COM-POST. Based out of Nashville, TN, RH and Daniel are requesting participation via snail mail and all contents will be included in their zine. The goal is to establish a community through free participation in the common act of sharing. So simple, so great! I've finally finished my contribution and am mailing it today.
Hope they enjoy!


Hope they enjoy!


Subscribe to:
Posts (Atom)